Chapter 2 - Remote and automated tuning

Table of Contents
This chapter is part of a series of posts:
- Remote control the great Stockcorner JC3-s tuner
- Automate remote & local tuning of the JC3-s tuner
- Remote transmission and reception of all common operation modes, including voice
To learn more about the series, go here.
Chapter 2 - Auto-tune the JC3-s tuner⌗
In the previous post I explained how I use an ESP8266 based development board, a transistor, buck converter and some wires to tap into the control box of the JC3-s tuner. A process which can be applied to other tuners.
In this post, I’m going over on how to use this new found power to automate the tuning process.
To replicate elements presented you’ll need:
- An instance of Home Assistant
- A breadboard computer like a Raspberry Pi, or comparable
- node-RED install somewhere* on your network
- A way to control your tuner remotely, see the Chapter 1
You can run node-RED on any of your local devices, because you ideally communicate with all devices via their local host names. This way you can “develop” your flows on your machine and export/import later into the 24/7 node-RED host in your network.
Use cases for the Raspberry Pi⌗
Many HAMs have Raspberry Pis or comparable single board computers at home. Boards like the Raspberry Pi 4b are powerful enough to run light Desktop loads and can replace Intel NUCs or even older Notebooks completely - while consuming less power.
Thanks to Linux, the options are limitless on how to use the power and IO of a Pi. Here’s how I’m using my Pi 4:
- Run Ubuntu 20.04 LTS 64bit for Raspberry Pi 4
- Headless - aka without attached screen, keyboard or mouse
- xRDP Server, for when a visual remote session is required (which in my setup it rarely is)
- Permanently connected to the FT-991a
- Transmit and receive audio with the lowest possible latency
- Run flrig locally, but render it’s GUI on a remote XServer
- If needed: wstj-x, fldigi, js8call locally
In my use case, I spent little time in front of the transceiver. Most of my time I’m on the sofa or in my office, but I am still QRV using digi or even voice modes.
Node-RED for automation⌗
In the previous post, I briefly touched upon how Home Assistant offers powerful automations. Yet sometimes they are not enough (but the Home Assistant team is quickly catching up, soon Node-RED won’t be needed anymore).
Node-RED can fill the needs current Home Assistant automation leaves. Node-RED is a nodeJS based visual flow designer sponsored by IBM benefitting from a great community and numerous available custom nodes.
Node-RED is, like Home Assistant, friendly to non-coders. All you need is a talent for logic and the ability to formulate the idea of what you want to achieve.
With Node-RED’s dashboard node, creating a responsive dashboard is effortless. The integration between Node-RED and Home Assistant is tight.
I opted for a combination of native esphome APIs and Home Assistant integration.
esphome, Home Assistant and node-RED exchange notes⌗
esphome offers two methods to call exposed functionality of an esp, like polling sensors or setting GPIOs: Real-time event source and REST. MQTT is also available and prefered when an ESP is used in a low-power environment due to it’s ability to control sleep routines of an ESP.
I use native GET to poll the gosund SP111 plug for the current power draw:


Using the bidirectional home assistant integration, interacting with all devices under the control of Home Assistant is straightforward. This extends to platforms Home Assistant just integrates, like Philips Hue. Why not turn all bulbs in the house to red when you go QRV? Why not turn off the TV to avoid a nagging YL about your voice in the speaker?
For example, if I want to turn on the smart power plug, I can simply use home assistant nodes:

If you don’t have a powerful machine attached to your transceiver, you could install node-RED on the same machine running Home Assistant. This makes integration even easier, centralizing all things home automation.
flrig⌗
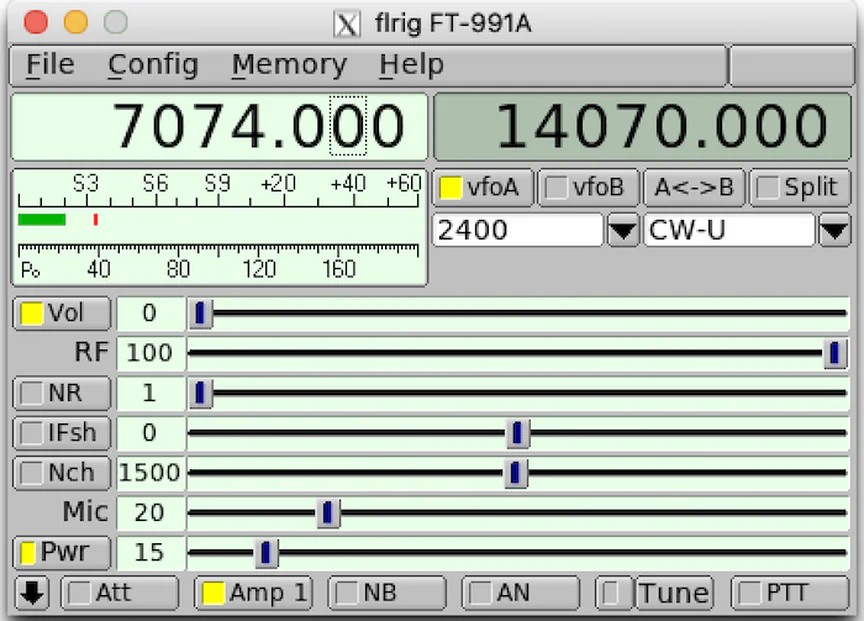
Part of the fl* series of great software package by W1HKJ & Associates, flrig connects to your transceiver can control most of its aspects. Many functions are exposed via an XML-RPC interface, enabling limited control of flrig via remote commands.
There are many guides on the Internet explaining the setup of flrig, I will only touch upon important tips required for this special use case.
flrig does not expose the “DT gain” meter of the FT-991a. When running digi modes, you must watch the ALC meter (by clicking on the S-Meter in flrig during transmit) and adjust the input volume reaching the FT-991a.
As of this writing, the ALC meter isn’t exposed via XML-RPC, leading to a decision discussed latest.
Adding a fixed virtual com port for flrig⌗
When you attach your transceiver to a Linux machine via USB, it will be assigned a virtual com port. This com port can change every time the device appears on the USB port. For the FT-991a, this is especially problematic: One USB cable carries both the USB sound card and the CAT interface. Both appear as /dev/ttyUSB* devices. It’s a lucky draw to have the previously set port work the next time. This makes a remote and headless operation cumbersome, automations impossible.
To have flrig (and all other applications sending CAT commands) find the FT-991a at the same spot all the time, we require an udev rule:
$ cat /etc/udev/rules.d/10-local.rules
SUBSYSTEMS=="usb", ATTRS{interface}=="Enhanced Com Port", ATTRS{bInterfaceNumber}=="00", GROUP="dialout", MODE="0666", SYMLINK+="ft991a"
After creating the rule, we can reload the udev system without a reboot via:
udevadm control --reload-rules && udevadm trigger
This udev rule ensures that whenever the FT-991a appears to the system, a symlink named ft991a will be created, pointing to the actuall hardware device, irrespective of the ttyUSB device assigned by the system.
Not only have we avoided the roulette, in addtion we lowred the required priliges required to access the device via GROUP="dialout", MODE="0666". A user intersted in communicating with the transceiver needs to be a member of the dialout group. No need for sudo.
Run flrig without an active local X session⌗
I see a lot of 90s styled webpages, best viewed in IE 7.0, telling you to use VNC to remote access a system attached to your rig. That is old school. VNC does not allow audio transport (xRDP does) and is horrible in performance.
Instead I propose two methods to connect to your session remotely with less overhead.
Short detour: If you really want to work in a virtual Desktop, please go for xRDP. Install guides: Ubuntu/arch - go for xrdp-git/debian. To enable audio ingress and egress, install xrdp pulseaudio. “Remmina” is the name of a good Linux client. macOS users can search for “Royal TSX” on the Appstore, Windows users can use the native Window Remote Desktop client. Apache Guacamole is a web remote gateway, which enables access from a browser with bidirectional sound redirection. I make use of that on my root server for when I don’t trust the machine I am using.
Method a) Remote headless X server⌗
My first attempt was to never ever look at flrig and just communicate with via XML-RPC. The approach I ended up with still utilizes XML-RPC to an extent, but flrig’s XML-RPC implementation doesn’t expose all functions of the GUI, and therefore it is not enough.
Therefore I’m currently not using this approach, but if you want to try, here’s the command:
xvfb-run -a flrig
xvfb-run is a script which triggers the virtual display server “X virtual frame buffer”. It’s a neat service to run apps which deny startup if they can’t find a display to render to. In case of flrig, we can use this if we are happy with the XML-RPC exposed functionality.
|         Function         | Key |              Description                 |
| ------------------------ | --- | ---------------------------------------- |
| main.set_frequency       | d:d | set current VFO in Hz                    |
| main.get_version         | s:n | returns version string                   |
| rig.get_AB               | s:n | returns vfo in use A or B                |
| rig.get_bw               | s:n | return BW of current VFO                 |
| rig.get_bws              | s:n | return table of BW values                |
| rig.get_bwA              | s:n | return BW of vfo A                       |
| rig.get_bwB              | s:n | return BW of vfo B                       |
| rig.get_info             | s:n | return an info string                    |
| rig.get_mode             | s:n | return MODE of current VFO               |
| rig.get_modeA            | s:n | return MODE of current VFO A             |
| rig.get_modeB            | s:n | return MODE of current VFO B             |
| rig.get_modes            | s:n | return table of MODE values              |
| rig.get_sideband         | s:n | return sideband (U/L)                    |
| rig.get_notch            | s:n | return notch value                       |
| rig.get_ptt              | s:n | return PTT state                         |
| rig.get_power            | s:n | return power level control value         |
| rig.get_pwrmeter         | s:n | return PWR out                           |
| rig.get_smeter           | s:n | return Smeter                            |
| rig.get_split            | s:n | return split state                       |
| rig.get_update           | s:n | return update to info                    |
| rig.get_vfo              | s:n | return current VFO in Hz                 |
| rig.get_vfoA             | s:n | return vfo A in Hz                       |
| rig.get_vfoB             | s:n | return vfo B in Hz                       |
| rig.get_xcvr             | s:n | returns name of transceiver              |
| rig.get_volume           | s:n | returns volume control value             |
| rig.get_rfgain           | s:n | returns rf gain control value            |
| rig.get_micgain          | s:n | returns mic gain control value           |
| rig.set_AB               | s:s | set VFO A/B                              |
| rig.set_bw               | i:i | set BW iaw BW table                      |
| rig.set_bandwidth        | i:i | set bandwidth to nearest requested value |
| rig.set_BW               | i:i | set L/U pair                             |
| rig.set_frequency        | d:d | set current VFO in Hz                    |
| rig.set_mode             | i:i | set MODE iaw MODE table                  |
| rig.set_modeA            | i:i | set MODE A iaw MODE table                |
| rig.set_modeB            | i:i | set MODE B iaw MODE table                |
| rig.set_notch            | d:d | set NOTCH value in Hz                    |
| rig.set_power            | i:i | set power control level, watts           |
| rig.set_ptt              | i:i | set PTT 1/0 (on/off)                     |
| rig.set_vfo              | d:d | set current VFO in Hz                    |
| rig.set_vfoA             | d:d | set vfo A in Hz                          |
| rig.set_vfoB             | d:d | set vfo B in Hz                          |
| rig.set_split            | i:i | set split 1/0 (on/off)                   |
| rig.set_volume           | i:i | sets volume control                      |
| rig.set_rfgain           | i:i | sets rf gain control                     |
| rig.set_micgain          | i:i | sets mic gain control                    |
| rig.swap                 | i:i | execute vfo swap                         |
| rig.cat_string           | s:s | execute CAT string                       |
I am still using XML-RPC for the automatic tuning process in Node-RED, which I will explain in a minute. Or hour.
Method b) Rendering remote flrig locally⌗
In my setup, I don’t need a virtual desktop at all. This saves resources. I can do this because macOS has the ability to run an X Server via XQuartz, which in turn can render applications running on a remote system. This a very neat aspect of the separation between X Servers, Window Managers and applications in the world of *NIX
To its credit, Windows 10 can also run a X Server.
Assuming you have access to an X server and you can SSH into a machine having flrig installed, then starting flrig can be as simple as this:
ssh -Y [email protected] flrig
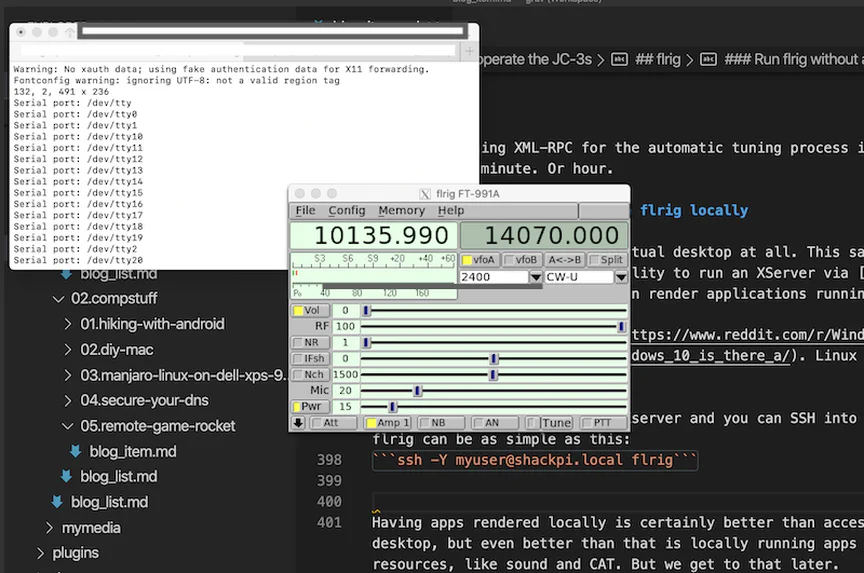
The app is running on the remote machine, but its rendered locally on your machine. The magic of *nix.
Having apps rendered locally is certainly better than accessing them via a virtual desktop. The traffic between your local client and the remote server is tunneled via SSH – depending on the configuration of this tunnel, traffic is not only encrypted, but also compressed.
Even better than mere local rendering, is tapping into remote resources, like sound and CAT control. We get to that in a minute.
We have most components together. You can stop here if you don’t need audio from your transceiver on your local machine (or are happy with xRDP for that) and if you don’t require automation for tuning.
flrig’s XML-RPC and node-RED⌗
No matter if flrig runs in a virtual frame buffer, is rendered locally or remotely: Once it’s running on the machine connected to the rig, we can use XML-RPC to poll and set different states:
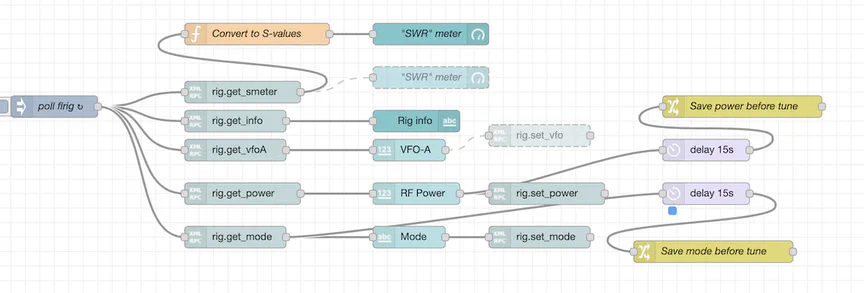
With the knowledge of the XML-RPC functions rig.get_mode/rig.set_mode, rig.get_power/rig.set_power and rig.set_ptt, we can create a Node-RED node flow which automates the FT-991a side of tuning by controlling the operation mode and RF power.

svc: switch.toggle kicks our little ESP8266 in action. It calls Home Assistant to trigger the ESP to close the gate of the transistor and thus puts the tuner into tune mode. Once this action has been triggered, node-RED’s trigger nodes take care to set the FT-991a’s mode to ‘AM’ and RF power to ‘15’ - Settings required for tuning.
After 12 seconds, the flow sets mode and power back to their states saved 15 seconds before with the change node named “ave X before tune”
The total time allocated to tuning is 12 seconds. Power and mode are saved every 15 seconds. There are surely smarter ways, like saving mode and power once tuning has been triggered and before the action starts, but this timer-based approach works for me.
Notice how I don’t poll and use the LED (KEY) status from the ESP8266 to determine if I’ve tuned up successfully. Since I switched from headless flrig to a locally rendered flrig, I have an S-Meter to check whether tuning was successful. This is better than checking if an LED turns off before the internal time limit of the tuner for its tuning mode runs out.
For auto-tune to work, flrig must be started after the rig has been powered on and after the ESP8266 “booted” up. Please keep this in mind.
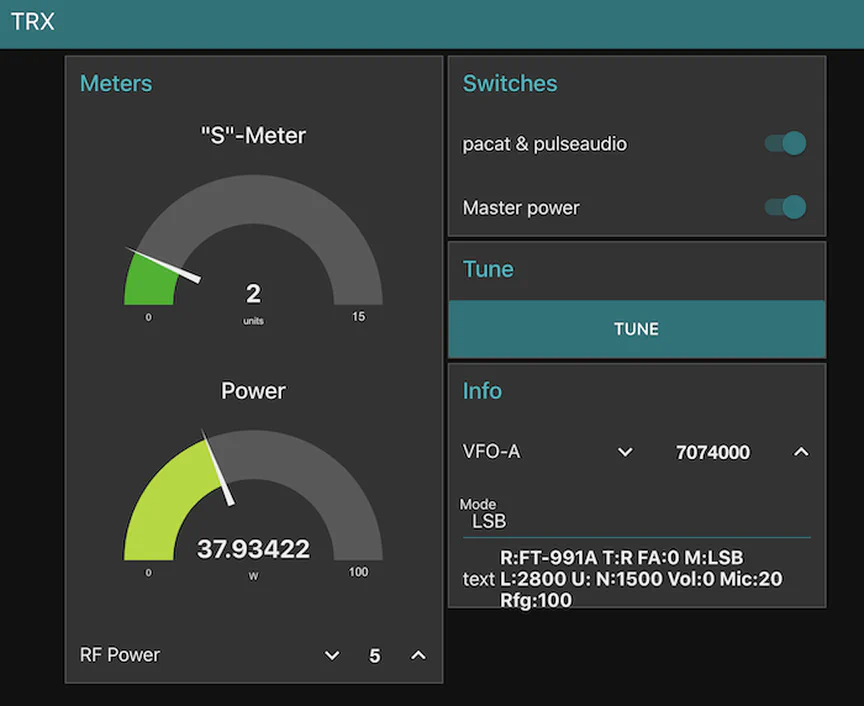
Bonus: S-Meter⌗
flrig has a rig.get_smeter call which delivers values from 0 to 100. This isn’t especially useful when you want S-Meter values in a gauge in Node-RED. If you opt to render flrig’s UI one way or the other, you may not need this, but I still find I require an Meter gauge in Node-RED for when I want to monitor the rig.
Using a remote flrig instance with digi mode apps⌗
A neat feature of flrig comes from it’s well established position in the HAM radio ecosystem. Popular digital mode tools like fldigi and wsjt-x, as well as its siblings jtdx and js8call, offer the ability to set flrig for radio control:
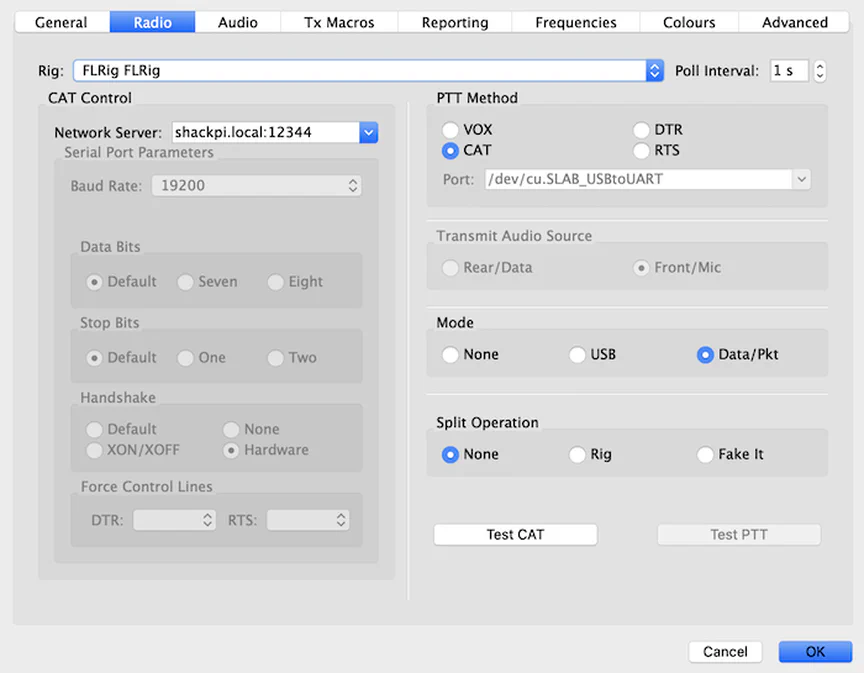
For some reason, the XML-RPC port of flrig is not documented. The default is ‘12345’ – yes, really. You can change it in ~/.flrig/flrig.prefs
Now all components are complete to remotely power, adjust and tune our shack.
What is missing is a proper, low-latency bidirectional audio transport. Without it, we cannot run digi modes or voice applications from our local machine. Luckily, there are also great open source methods to achieve this. More on that in chapter 3